
Indian passport renewal USA, Documents list, NRI online application form. Processing time 1-4 weeks, 2 photo. Police verification required. US legal status required.
AM22Tech Team Updated 2 Aug, 24
You can easily renew your Indian Passport in the USA after 10 years with VFS Global.
A step-by-step process for re-issue of the passport with the Indian embassy in New York, Houston (Texas), Washington DC, Atlanta (Georgia), Chicago (Illinois), SFO (San Francisco, California), and Seattle Indian consulate.
This article will discuss:
Your Indian passport renewal will take 3-6 weeks if the last passport was issued in India.
You can get a new passport in 10 days if your last passport was issued by the Indian Embassy in the USA.
You can apply for renewal 1 year before expiry. We recommend applying 6 weeks before the final expiry to avoid issues with delays in processing at the Indian embassy.
#1 Expiring Passport
An original and most recent passport is required to be sent. All other OLD passports, if any, are not required.
#2 Photographs
A total of 2 photos of size 2×2 Inches are required for passport renewal.
The photo should have a white background and not off-white.
You can get passport-size photos online or at Walmart, CVS, or Walgreens.
#3 NRI Government passport renewal application form
The passport application form will be provided by the Indian government site for printing. Detailed steps are given below.
#4 Highest qualification degree (Optional)
Indian embassy requires your education details to decide if an ECR Stamp is required on your passport or not.
We recommended sending a copy of the Highest Educational Qualification Degree like an MCA or MBA. It is not required but there is no harm in sending it.
#5 USA Address proof (Color, Notarized)
You can safely opt to get the USA address printed on an Indian passport. There is no harm.
#6 Indian Address Proof
Indian address proof is required if you want to add or change the current Indian Address printed on your passport.
Does the current passport have an Indian hostel as a permanent address?
#7 Change of Appearance / Signature Form (Notarized)
A change of appearance form is required. You can either download and fill out the form yourself or use this app to create one.
Everybody’s presence changes a little as you age.
#8 VFS Document checklist
Download the VFS document checklist here. Print and fill it out as you collect documents.
#9 Annexure ‘E’
Annexure E affidavit is required and you can get it from the VFS site.
You can also create the same form using this app which validates all your data and offers a full refund if it is rejected by the Indian embassy:
#10 Copy of Passport
Photocopy of the First 5 pages of YOUR passport along with the last 2 pages. You can use an app-based scanner.
#11 Marriage Certificate (Optional)
Are you Married and want to add your Spouse’s name to the new passport?
#12 US Legal Status (Color, Notarized)
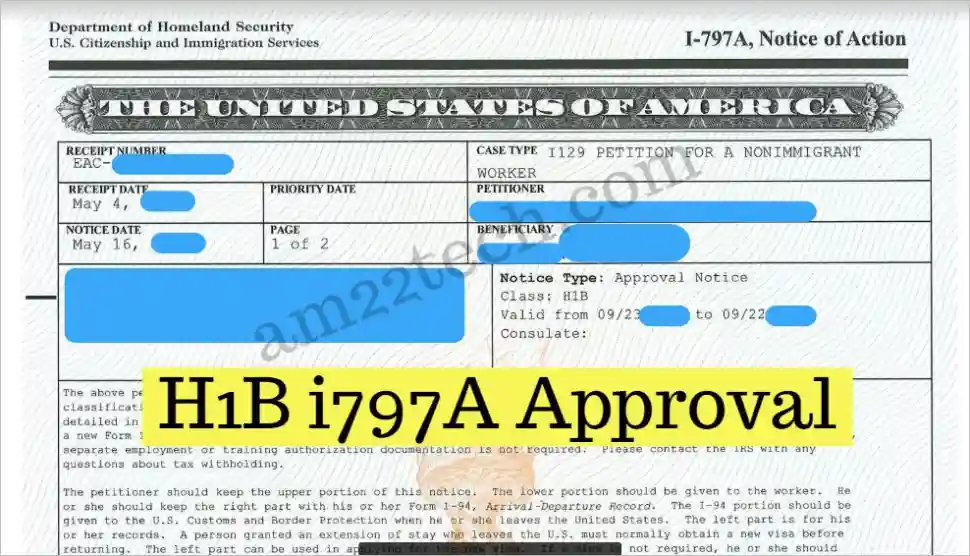
You can even use the USCIS receipt number copy.
#13 Birth Certificate / School Leaving Certificate (Optional)
#14 Police Report (Only if Passport lost or stolen)
#15 Additional Documents for Child Passport
Annexure D is required for the Child’s Indian passport. You can create this affidavit using this app which will validate all the data to make sure it is not rejected by the Indian embassy.
#16 Annexure F/L for lost or damaged passport
If your current passport was lost or damaged, then you need an Annexure F affidavit too.
Start your passport application here on the Indian government website.
You will need to register for each person separately on this website. We suggest using this website on your laptop or PC as the site is messed up on mobile.
#Step 1 Click the ‘Register’ button and fill in the details.
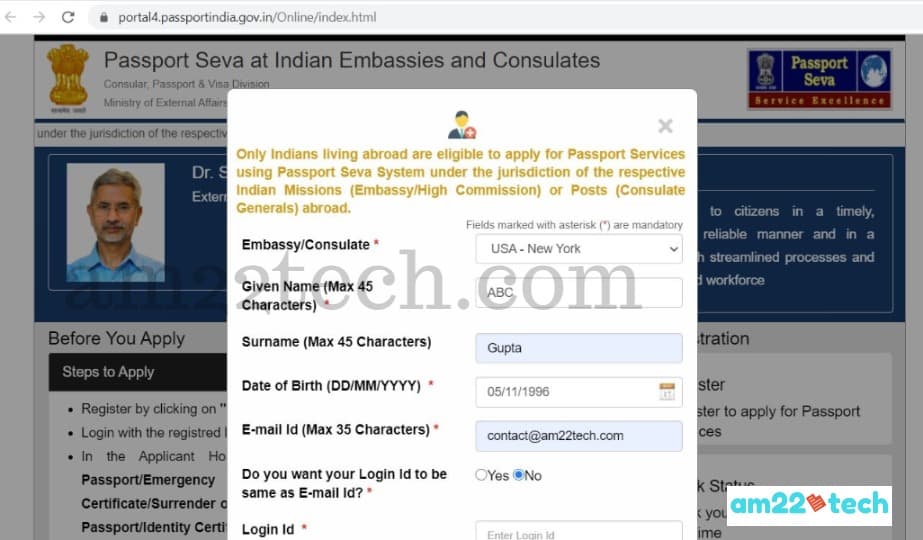
#Step 2 An email is sent to you to verify your email. Click the link in the email to activate your online account.
#Step 3 You will be asked to log in again after you have activated your account. Log in again and then this screen will be visible:
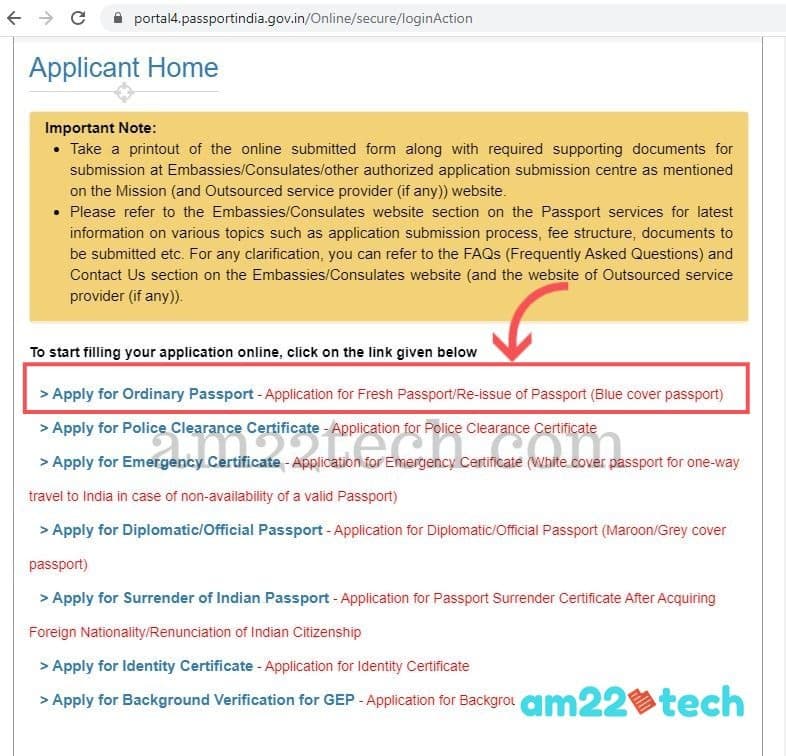
Select the option “Apply for Ordinary passport – Application for fresh passport/Re-issue of Passport (Blue cover passport)“
#Step 1 Start the Passport application by filling ‘passport-type‘ section.
These are the sample values that will apply to most people.
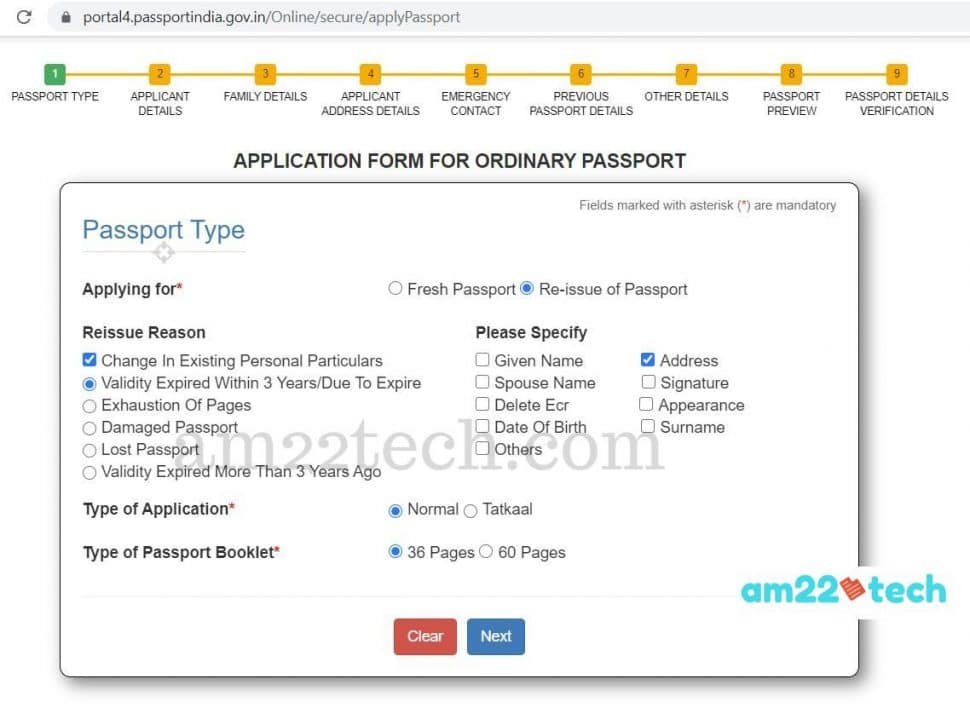
#Step 2 Click next and fill in ‘Applicant details‘. Click next once done.
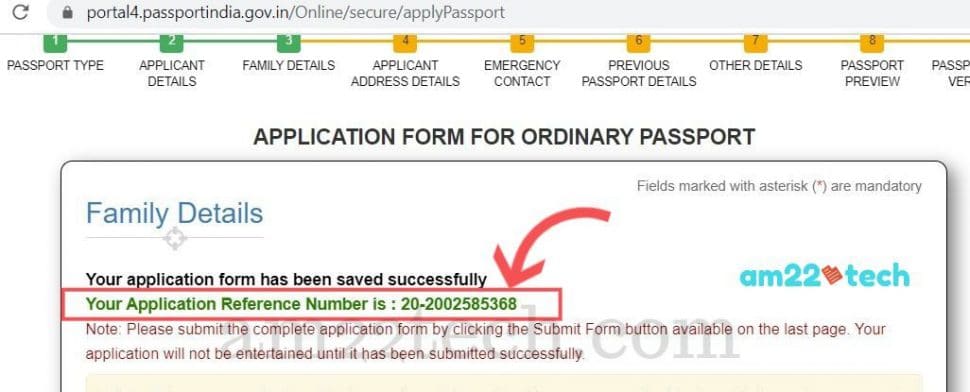
Once you click ‘Save’, your application is saved and an ‘Application reference number’ (ARN) is generated and shown on top of the current page:
#Step 3 Family Details
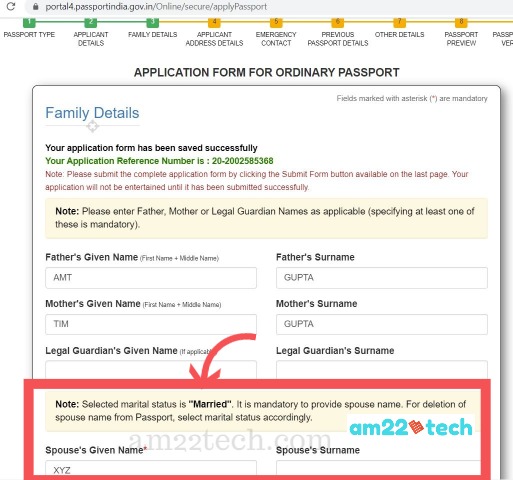
Enter family details like Father, mother, and spouse name.
Spouse name is mandatory if you have selected the marital status as ‘married’.
#Step 4: Applicant Address Details
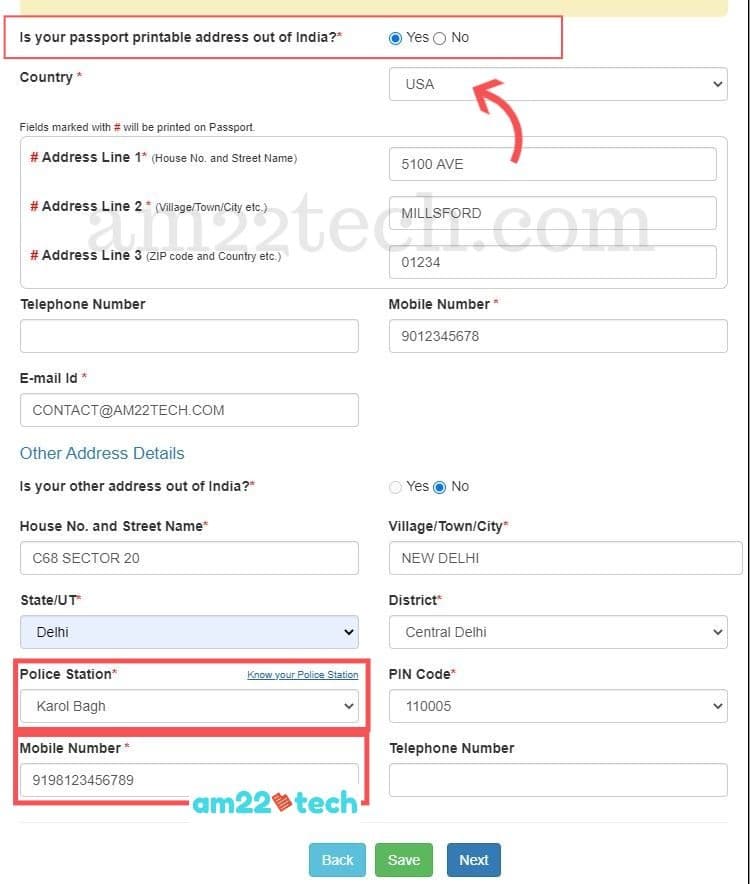
Your presence at an Indian address is not mandatory. Indian embassy understands that you are physically present outside India.
It is mandatory to provide at least one Indian address in the form. It will be used for police verification. You can give your parent or relative’s Indian address.
You can choose these combinations:
| Passport Print Address | Other Address |
| USA | Indian |
| Indian | USA |
In this example image, we are opting to print a US address on the passport and then providing an Indian address as ‘other address’:
#Step 5 Enter emergency contact details
We suggest providing details of the person who you know in the USA. You can provide anyone from India too. It’s your choice.
#Step 6 Previous Passport Details
Enter details and click next.
#Step 7: Other Details
Enter details and click next.
#Step 8 Passport Review
Enter details and click next.
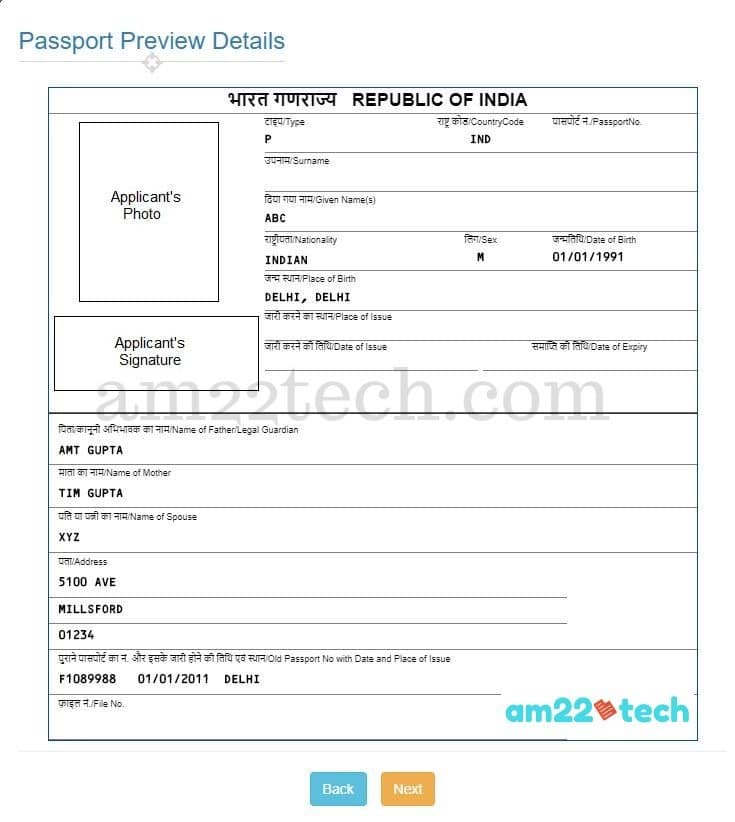
#Step 9 Passport preview
Step 9 shows a nice preview of the new passport’s biometric page. Verify your information and click next.
#Step 10 Verify and Submit
The last step is to verify all the details and then submit your application. You can make changes before clicking the ‘Submit‘ button.
Your application is locked once you click ‘Submit‘ and changes cannot be made.
Once you have submitted it, you can print the application from the Applicant Home page.
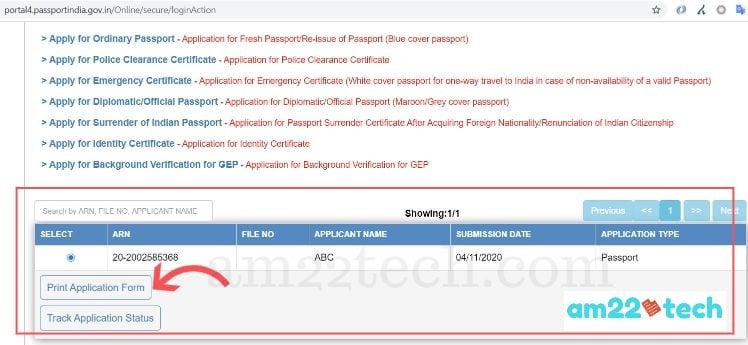
You should print the passport application on one side of the white paper only. Leave the back side blank. Do not double-print.
You should sign the printed application with a black or blue pen only.
VFS’s website and the instructions are half baked and it seems they have been given the contract at the last moment.
But, the problem is that there is no other way to register either (at least we could not find any).
VFS services are used for postal Envelopes, Payments & shipping of your documents.
This is also not a mobile-friendly website. So, we suggest using a desktop.
Select the ‘Passport‘ box (Blue color) and then you will see a new form open up:
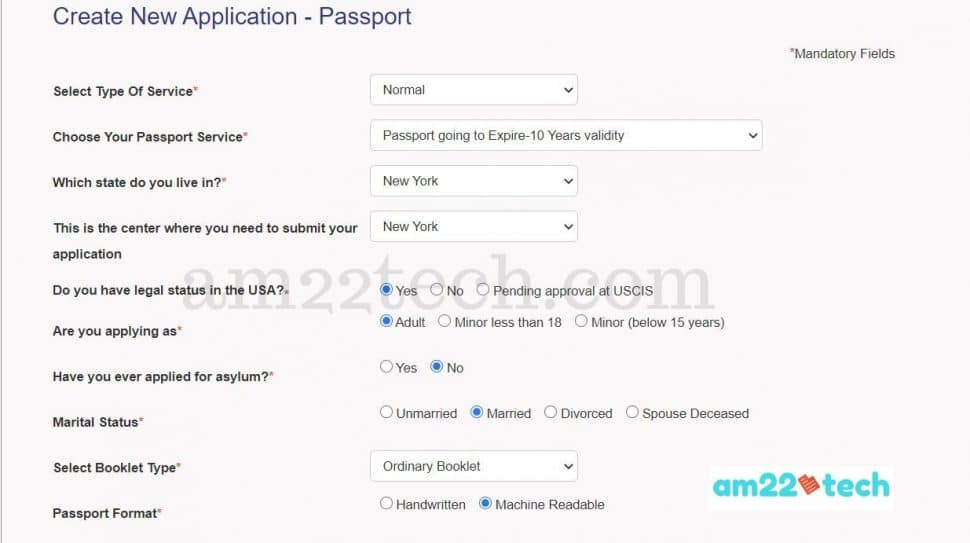
Click the button ‘Proceed‘.
#Step 2 Fee Details
The total fee for Indian passport renewal is $100+. VFS service fee is also added separately.
Now, once you click the ‘proceed‘ button, you will be asked to register and activate the registration by email. Once you are done, you will have to REDO the whole VFS application. Amazing!
#Step 3 Click ‘Create a new application’.
Enter the details again on this page after logging in to the VFS portal system.
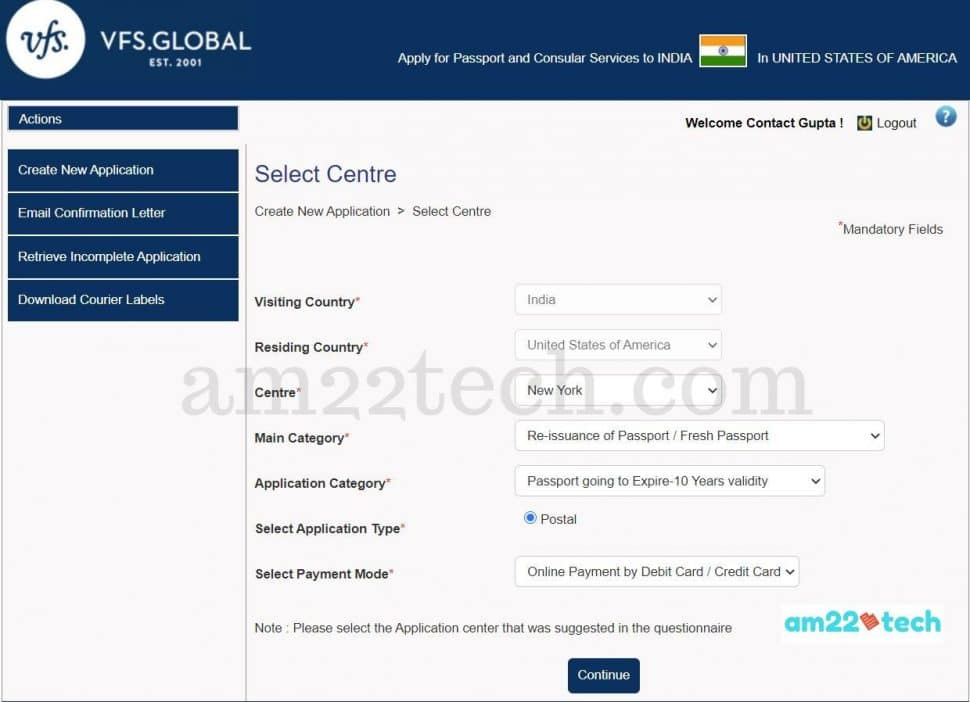
#Step 4 Click the ‘proceed’ button and you will be asked to add a customer.
#Step 5 Click ‘Add customer‘ and you will see this screen where you will be asked to once again enter all your information.
Make sure you enter the Indian government website’s ARN number in the ‘Govt reference number’ field:
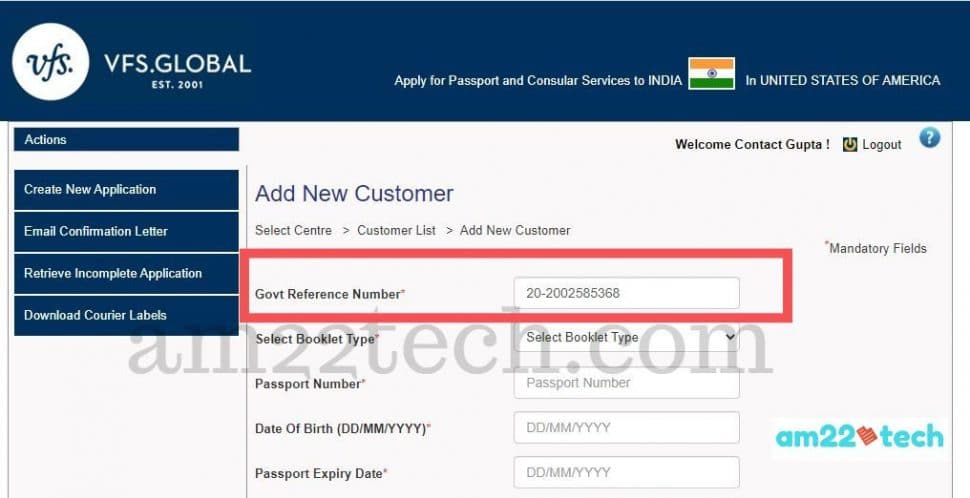
Click the ‘Submit‘ button.
#Step 5a Many people have complained that they are not able to see the ‘select courier service’ after adding a customer.
Try this as it worked for us:
#Step 6 Select Courier Service
You reach the customer list screen.
Note down the VFS reference number. This will be required to search your application if you are automatically logged out.
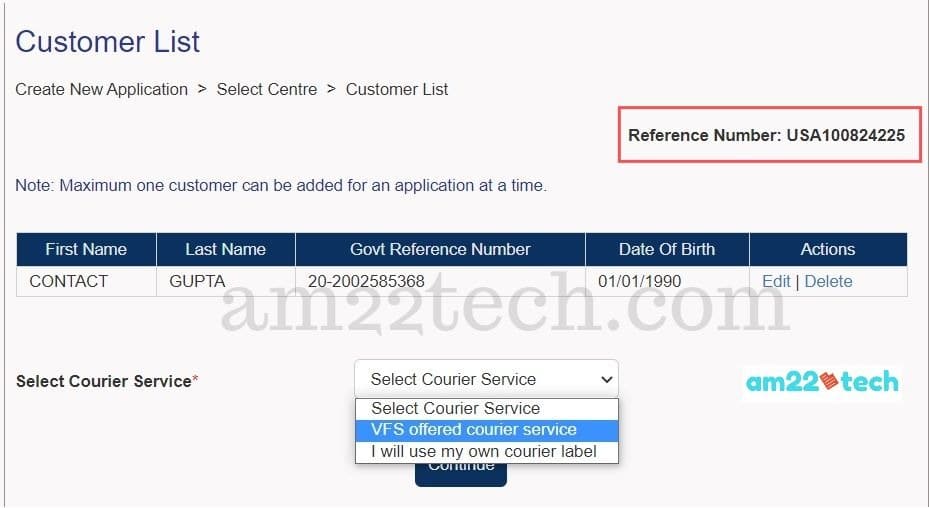
We recommend VFS’s shipping option. They use FedEx and the cost is $30 for two-way shipping.
If you decide to use your courier service, do not forget to send a pre-paid envelope for return shipping.
#Step 7 Courier Service Address
Enter your mailing address here and not VFS Global’s address.
The USA address on your prepaid shipping label should match the proof of address document submitted.
#Step 8 Confirm Application
Click the ‘confirm application’ button and then you will be automatically taken to a payment site named ‘Adyen.com’.
#Step 9 Download Courier Labels
Once the online payment is completed, you can download the shipping labels and send your application package.
Self attest means that you should sign yourself on the photocopy. No notary is required.
Self Attest these documents:
A parent needs to sign along with his/her child.
Both parent and child need to self-attest. Each parent should self-attest their document. Get your child to sign all documents too.
The mother should sign her own and the Father should sign his documents. The mother cannot sign the father’s document and vice versa.
For general documents (like forms), any parent can sign.
Visit the FedEx office, pick up the FREE envelope (included in the shipping fees you paid to VFS), and send it with VFS’s FedEx shipping label within 15 days of generating the label.
NOTE: No need to send a return envelope. It will be taken care of by VFS if you opt for VFS shipping.
The ECR and ECNR proof is not required for Indian passport renewal in the USA.
The ECR/ECNR status is available on page 2 of the Indian passport.
If it is not there or nothing is mentioned in your passport, you can select option ECNR (Emigration check not required) on point 13.
Can I send ECR, and ECNR Proof even if it is not required?You can send a photocopy of your highest educational qualification degree like an MCA (Masters in Computer Applications) for ECNR proof.
If you do not attach any proof and your old passport does not have the ECR stamp, you will automatically be considered eligible for ECNR.
No notarization is needed. Just Self-attest with your signature and mark the photocopy with “For ECNR – Documentary proof”.
Where to Get an Indian Passport Photo in the USA?You can get Indian Passport photos at Walmart, CVS, or Walgreens. ePassportPhoto offers free delivery and just $1.5 per picture.
Where Can I Get a Free Notary for Indian Passport Renewal?Your local city library, Bank (like Bank of America, and Chase), and your own office are the FREE notary options for Indian passport renewal.
USPS, FedEx, and other local mail shops would charge around $5+ per page of the notary.
Is the Aadhar number mandatory for Indian passport renewal in the USA?An Aadhar number is not mandatory for Indian passport renewal in the USA.
Is a Spouse’s name mandatory for married people?The Indian passport application website does make it mandatory to provide a spouse’s name if you select your marital status as ‘Married’.